Implementing Github actions in your Python project

A
I am a Software Engineer. I have worked with different languages like NodeJS and Python. I have keen interest in Backend Engineering, Cloud Native Technologies and System Architecture.
Search for a command to run...
I am a Software Engineer. I have worked with different languages like NodeJS and Python. I have keen interest in Backend Engineering, Cloud Native Technologies and System Architecture.
No comments yet. Be the first to comment.
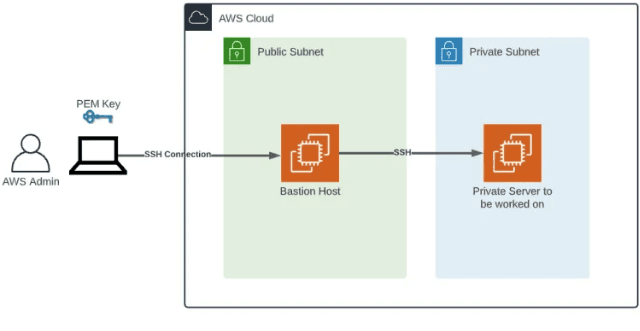
What is a Bastion host? A bastion host is a server whose purpose is to provide access to a private network from an external network, such as the Internet. Because of its exposure to potential attack, a bastion host must minimize the chances of penetr...
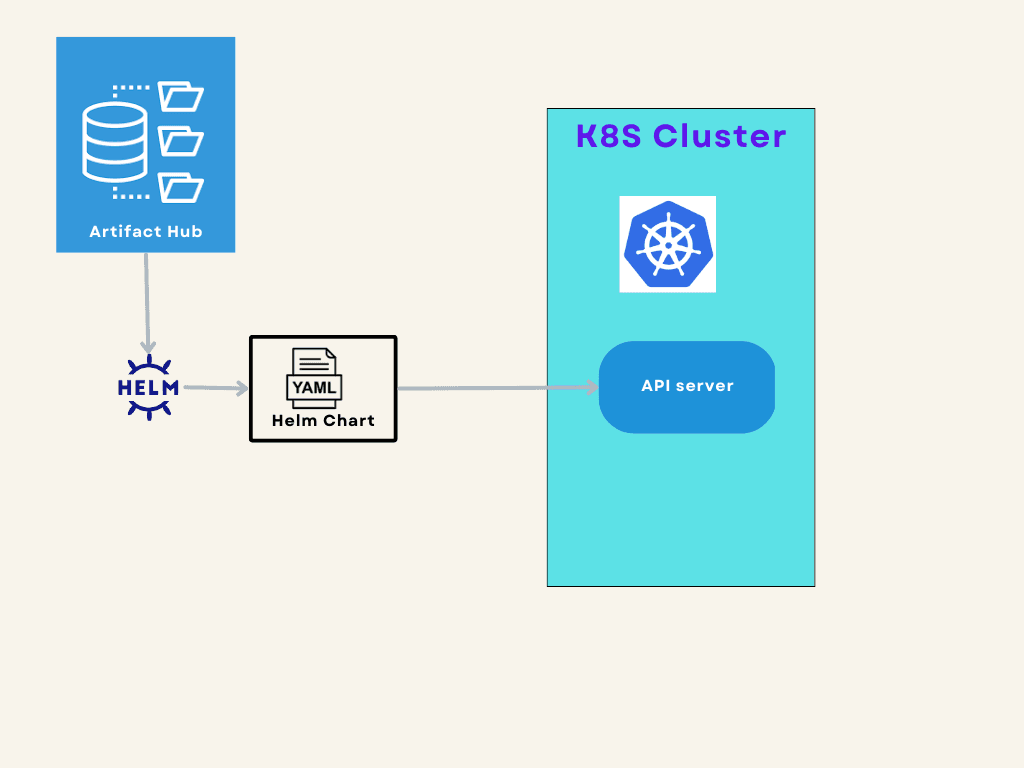
What is helm? Helm is a package manager for Kubernetes. It makes updates and rollback of applications more efficient and improves team collaboration. Kubernetes objects are challenging to manage Helm automates maintenance of YAML manifests for Kubern...
Flake8 is a popular lint wrapper for python. In this article, we will understand the uses of flake8 against our python projects. What is flake8? Install flake8 in your project Run flake8 against your project Configure flake8 in config.cfg What ...
In this article, we will go through the installation of Kubernetes in your local system and run a simple nginx server via kubernetes. We need to follow this process Introduction to kubernetes Install minikube locally Run your first pod Access kub...

Automation is the key to streamlining your work processes for any software development project. GitHub actions allow you to add your software development lifecycle workflows directly to your repository.
GitHub Actions is a continuous integration and continuous delivery (CI/CD) platform that allows you to automate your build, test, and deployment pipeline. You can create workflows that build and test every pull request to your repository or deploy merged pull requests to production.
All in all, it's a great tool for integrating your project with CI/CD pipeline. And it's great to know how to integrate it into your project.
In this article, we will implement a GitHub workflow in a python project and see it in action.
Let's create a simple python-project by running the following commands.
mkdir simple-calculator
cd simple-calculator
Let's activate the virtual environment in your project.
python3 -m venv .env
source .env/bin/activate
Add a file calculator.py to your project and add the following content to it
class Calculator(object):
    def __init__(self, *args):
        super(Calculator, self).__init__(*args)

    def addition(self, a, b):
        return a + b

    def substraction(self, a, b):
        return a - b

    def multiplication(self, a, b):
        return a * b

    def division(self, a, b):
        return a / b
Now we need to add tests for four projects.
We first need to install pytest in your project.
pip install pytest
Now Let's add tests for our calculator.py methods. We can add a directory called tests and inside the directory create one file called test_calculator.py .
We also need to add an __init__.py inside the tests directory to run the tests successfully.
We can add the following content in our test_calculator.py file.
import pytest
from calculator import Calculator


@pytest.fixture
def calculator():
    return Calculator()


class TestClass:

    def test_addition(self, calculator):
        assert 7 == calculator.addition(3, 4)

    def test_substract(self, calculator):
        assert -1 == calculator.substraction(3, 4)

    def test_multiplication(self, calculator):
        assert 12 == calculator.multiplication(3, 4)

    def test_division(self, calculator):
        assert 2 == calculator.division(4, 2)
Now if you run pytest command on your project directory you should see all the testcases are passed.

Flake8 is a popular lint wrapper for python. We will use flake8 in our project for linting.
If you want to have more knowledge about integrating flake8 in your python project, please visit this article - https://techblog.akashojha.com/invoke-flake8-in-python-project.
Let's install flake8 in our project
pip install flake8
Now Let's run flake8 against our project once.
flake8 . --count --max-complexity=10 --max-line-length=127 --statistics
If you don't have any errors, you should have an output 0. Otherwise, if you're getting some errors please try to resolve this first by going through the warning logs.

For example, You can see in the above image that I had 1 error when I first ran the flake8 command in my terminal. Then I resolved it and got 0 errors.
Now that your basic project is set up let's dive into the implementation of github-workflows for your project.
Let's create the .github/workflows directory.
mkdir -p .github/workflows
This is the location where all your workflows will be added.
Let's create our first workflow inside this directory. We need to add the workflow in a YAML file. So, Let's create linting-testing.yaml file and let's add the following content to that file.
name: simple-calculator-linter-testing workflow

on: [push]

jobs:
  build:

    runs-on: ubuntu-latest
    strategy:
      matrix:
        python-version: ["3.8", "3.9", "3.10"]

    steps:
      - uses: actions/checkout@v3
      - name: Set up Python ${{ matrix.python-version }}
        uses: actions/setup-python@v4
        with:
          python-version: ${{ matrix.python-version }}
      - name: Install dependencies
        run: |
          python -m pip install --upgrade pip
          pip install flake8 pytest
          if [ -f requirements.txt ]; then pip install -r requirements.txt; fi
      - name: Lint with flake8
        run: |
          # stop the build if there are Python syntax errors or undefined names
          flake8 . --count --select=E9,F63,F7,F82 --show-source --statistics
          # exit-zero treats all errors as warnings. The GitHub editor is 127 chars wide
          flake8 . --count --exit-zero --max-complexity=10 --max-line-length=127 --statistics
      - name: Test with pytest
        run: |
          pytest
Let's go over the syntax details of our workflow-YAML file one by one.
| Syntax keys | Description |
| name | You can add a suitable name for your workflow here. |
| on | Here you need to define which events you will trigger the workflow. In the above scenario, it will trigger whenever someone pushes any changes to the repository. |
| jobs | A set of tasks sequentially defined under simple-calculator-linter-testing workflow |
| build | It's the name of our first and only job |
| runs-on | Configures the job to run on the latest version of an Ubuntu Linux runner. This means that the job will execute on a fresh ubuntu-latest virtual machine hosted by GitHub. |
| strategy | strategy is used for matrix strategy for your jobs. A matrix strategy lets you use variables in a single job definition to automatically create multiple job runs that are based on the combinations of the variables. |
| matrix | strategy.matrix is to define a matrix of different job configurations. In the above example, the above matrix defines a variable python-version with the values["3.8", "3.9", "3.10"] . |
In this example, the workflow will run 3 jobs, one for each python-version variables. Each job will access the python-version value through the matrix.python-version context and pass the value as python-version to the actions/setup-python@v4 action. |
| steps | Groups together all the steps that run in the build job. Each item nested under this section is a separate action or shell script. |
| steps.name | The name keyword under steps is just for defining the name of that step. |
| uses | The uses keyword specifies that this step will run v3 of the actions/checkout@v3 action. This is an action that checks out your repository onto the runner, allowing you to run scripts or other actions against your code (such as build and test tools). You should use the checkout action any time your workflow will run against the repository's code.
In the next section of uses keyword, the actions/setup-python@v4 action to install the specified versions of Python. This puts a specific version of Python preinstalled in our path. |
| with.python-version | Here the value should be the specific version of Python. In this scenario, a total of 3 jobs will run with python versions - 3.8, 3.9, 3.10 as defined under the strategy.matrix . |
| run | The run keyword tells the job to execute a command on the runner. In this case, you are using python -m pip install --upgrade pip to install pip and using pip to install flake8 pytest. In the next section run keyword, we are using flake8 and pytest for checking linting errors and testing respectively. |
I hope I'm able to give you the overall context of the workflow file. Please visit the official documentation link to get a detailed understanding of the workflow - https://docs.github.com/en/actions/learn-github-actions/understanding-github-actions
Let's create a .gitignore file and the content of this link into the file - https://raw.githubusercontent.com/github/gitignore/main/Python.gitignore
And then create a requirements.txt file and add the python package dependencies into that file by running this command.
pip freeze > requirements.txt
Now that your project is set up, we need to push your code into a GitHub repository to see GitHub actions running a CI pipeline.
You need to have a GitHub account beforehand. If you don't have an account, please create one by signing up through the link - https://github.com/signup.
Let's create a repository called simple-calculator in your GitHub account.
And then run the following commands in the terminal inside your project directory path. Please replace the <username> with your GitHub username.
echo "# simple-calculator" >> README.md
git init
git add -A
git commit -m "first commit"
git branch -M main
git remote add origin git@github.com:<username>/simple-calculator.git
git push -u origin main
Now if you open your project and go into the Actions section, you should see all your jobs should be successful.
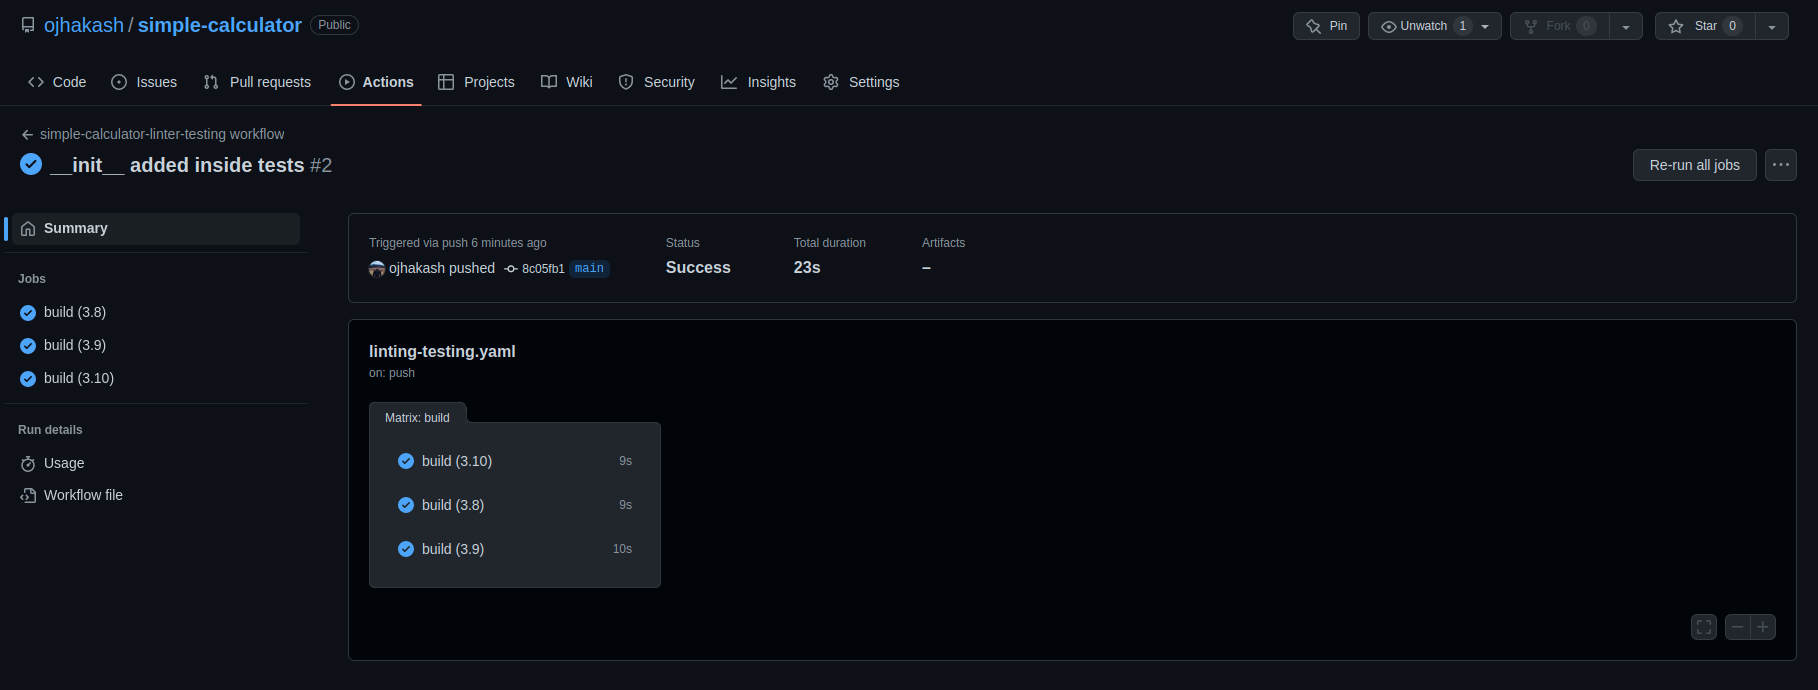
As you can see in the above image, 3 jobs have run successfully for 3 python versions(3.8, 3.9, 3.10). You should also be able to see something similar in your project.
We are able to implement GitHub action in our simple python project. Hopefully, you will be using GitHub actions in your next project.
Github link for this project - https://github.com/ojhakash/simple-calculator
Happy Learning!!