


Differences by responsibility
Django is a web framework used to build web applications.
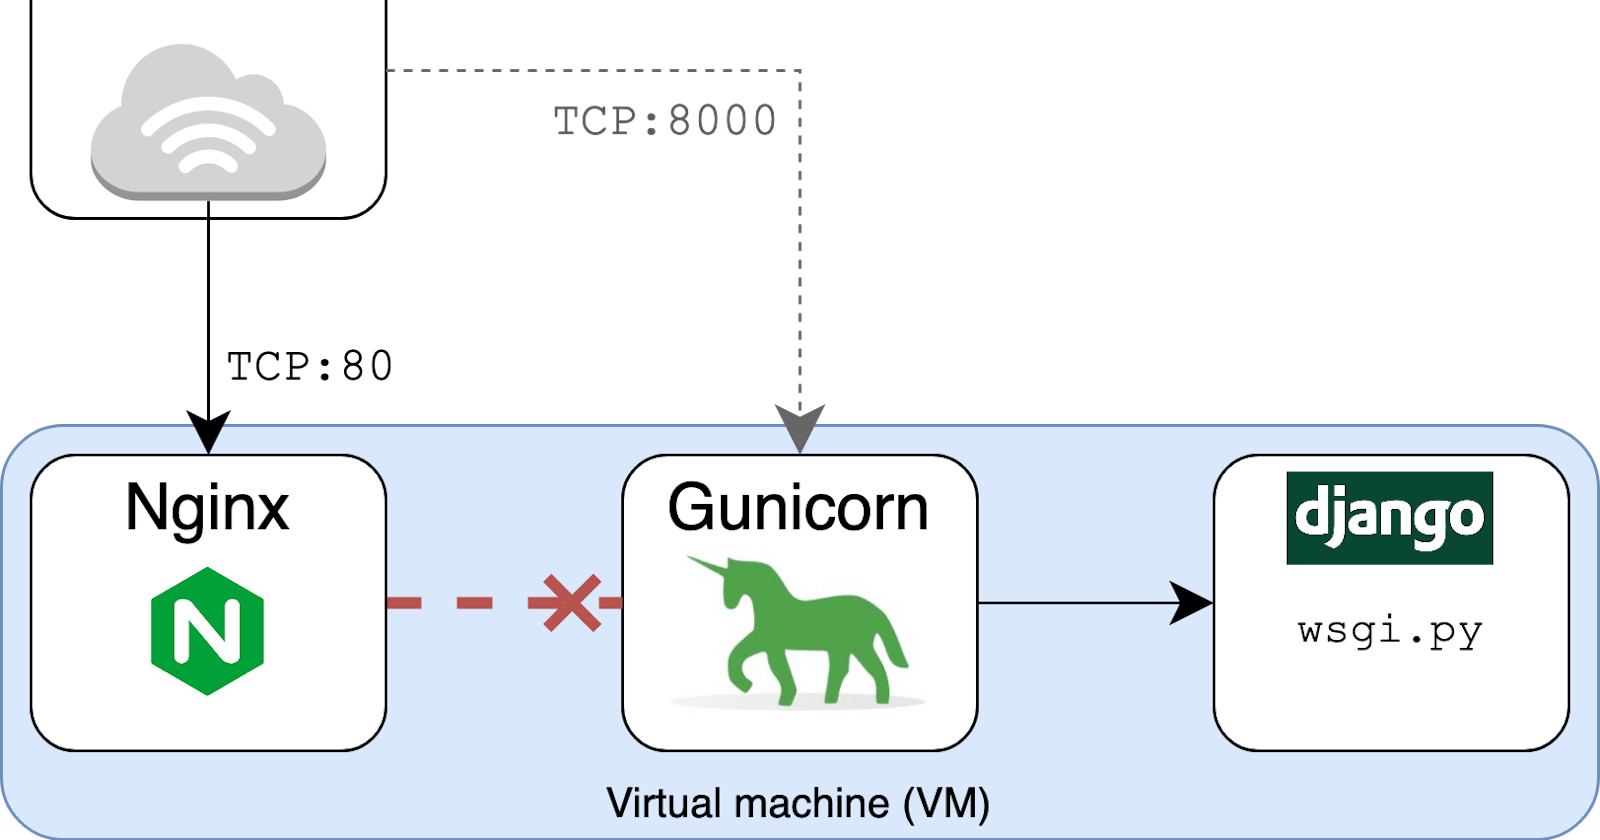
Gunicorn is an application server which transfers HTTP requests to web applications. It implements WSGI (Web Server Gateway Interface) which works as an interface between the web application and the web server.
Nginx is a web server that can be used as a reverse proxy server. It is capable of handling a large number of requests simultaneously.
Let's go step by step into this process
Django app setup
First, we need to create a simple Django app with minimal requirements. Let's create a simple Django app by following these steps
mkdir djnago_gunicorn_nginx
cd djnago_gunicorn_nginx
python3 -m venv .env
source .env/bin/activate
pip install django
django-admin startproject django_gunicorn_nginx .
python manage.py runserver
Now if you go to http://127.0.0.1:8000, you should be able to see Django application running on your browser. We're not going to do any Django configurations here.
Now that your Django app is set up and running. Let's jump into the Gunicorn setup.
Gunicorn install and setup
Install Gunicorn in your terminal
pip install gunicorn
Now, let's run your app via Gunicorn from shell by running this command
gunicorn -b 0.0.0.0:8000 --workers=2 django_gunicorn_nginx.wsgi:application
Congrats, you are just able to run your web application through Gunicorn.
Here '-b' is binding the app to the socket '0.0.0.0:8000', --workers=2 means 2 worker processes are running for accepting requests. Django_gunicorn_nginx.wsgi:application refers to a pattern $(MODULE_NAME):$(VARIABLE_NAME) in which MODULE_NAME would be to full dotted path to the module and VARIABLE_NAME refers to a WSGI callable that should be found in the specified module.
Let's configure Gunicorn properly in our app.
First, create a directory named 'config'. Then follow these steps.
mkdir config
nano config/gunicorn.py
Now add the following inside the file.
                                                                                                                                                                 """Gunicorn config for *development* environment"""
# Django wsgi appliation path, format MODULE_NAME:VARIABLE_NAME
wsgi_app = "django_gunicorn_nginx.wsgi:application"
# The granularity of error-log
loglevel = "debug"
# The number of processes will be running for handling requets
workers = "2"
# Socket to bind
bind = "0.0.0.0:8000"
# Restart worker when code changes
reload=True
# Write access and error log info
accesslog = errorlog = "/var/log/gunicorn/django_gunicorn_nginx.log"
# Redirect stdout/stderr to log file
capture_output=True
# PID file to fetch the process-id
pidfile = "/var/run/gunicorn/django_gunicorn_nginx.pid"
# Daemonize the gunicorn process
daemon = True
Let's create the necessary folders
sudo mkdir /var/{log,run}/gunicorn/
sudo chown -cR ubuntu:ubuntu /var/{log,run}/gunicorn/
Now start your app with Gunicorn by running this command
gunicorn -c config/gunicorn.py
Your app should be started running in the background through Gunicorn now.
If you want to see the logs generated for your app, please run the following command
tail -f /var/log/gunicorn/django_gunicorn_nginx.log
You should be able to see something like this
127.0.0.1 - - [16/Dec/2022:06:36:14 +0000] "GET /static/admin/css/fonts.css HTTP/1.1" 404 2170 "http://127.0.0.1:8000/" "Mozilla/5.0 (X11; Linux x86_64) AppleWebKit/537.36 (KHTML, like Gecko) Chrome/103.0.0.0 Safari/537.36" [2022-12-16 14:20:39 +0530] [3833089] [CRITICAL] WORKER TIMEOUT (pid:3833091) [2022-12-16 14:20:39 +0530] [3833089] [CRITICAL] WORKER TIMEOUT (pid:3833094) [2022-12-16 08:50:39 +0000] [3833091] [INFO] Worker exiting (pid: 3833091) [2022-12-16 08:50:39 +0000] [3833094] [INFO] Worker exiting (pid: 3833094) [2022-12-16 14:20:39 +0530] [4012073] [INFO] Booting worker with pid: 4012073 [2022-12-16 14:20:39 +0530] [3833089] [WARNING] Worker with pid 3833091 was terminated due to signal 9 [2022-12-16 14:20:39 +0530] [3833089] [DEBUG] 1 workers [2022-12-16 14:20:39 +0530] [4012075] [INFO] Booting worker with pid: 4012075 [2022-12-16 14:20:39 +0530] [3833089] [DEBUG] 2 workers
Let's configure your config/gunicorn.py and make it ready for deployment.
import multiprocessing
import os                                                                                                                                                          """Gunicorn config for *development* environment"""
# Django wsgi appliation path, format MODULE_NAME:VARIABLE_NAME
wsgi_app = "django_gunicorn_nginx.wsgi:application"
# The granularity of error-log
loglevel = "warning"
# The number of worker threads for handling requests. Set as per your requirements
threads = multiprocessing.cpu_count() * 2
# The number of processes will be running for handling requets. Set as per requirements
workers = multiprocessing.cpu_count() * 2
# Socket to bind
bind = "0.0.0.0:8000"
# Restart worker when code changes
reload=True
# Write access and error log info
accesslog = errorlog = "/var/log/gunicorn/django_gunicorn_nginx.log"
# Redirect stdout/stderr to log file
capture_output=True
# PID file to fetch the process-id
pidfile = "/var/run/gunicorn/django_gunicorn_nginx.pid"
# Daemonize the gunicorn process
daemon = True
# The number of seconds to wait for requests on a Keep-Alive connection.
keepalive = 60
# Workers silent for more than this many seconds are killed and restarted.
timeout = 90
Do visit the official Gunicorn page for more details about the configuration https://docs.gunicorn.org/en/stable/settings.html
To kill the process of running through Gunicorn, you can run this command.
sudo lsof -i :8000
To kill the process get the PID from the output logs and run the command.
kill <PID>
Nginx configration
Install and run Nginx in your system.
sudo apt install nginx
sudo service nginx start
Let's add Nginx configuration file by nano-editor.
sudo nano /etc/nginx/conf.d/django_gunicorn.conf
Add the following content to your configuration file already opened via nano-editor.
access_log /var/log/nginx/djnago-gunicorn-access.log;
error_log /var/log/nginx/djnago-gunicorn-error.log;


server {
        listen 80;

        location / {
                proxy_pass http://localhost:8000;
                proxy_set_header HOST $host;
      }
}
Now we should remove the default file from /etc/nginx/sites-enabled as it might take priority over the django_gunicorn.conf we created eariler.
And now we need to restart nginx.
sudo rm -rf /etc/nginx/sites-enabled/default
sudo service nginx restart
Now you should be able to see your django-app running via gunicorn and nginx by opening the localhost in your browser : http://localhost/
For adding your server domain name in Nginx you need to add this right below the listen 80; line server_name <your-domain-name>.com; . Also, you need to add the elastic-IP (for AWS) of your server to your DNS register under DNS settings.

Conclusion
If you can follow to the end and it was able to increase your knowledge, then I am
well pleased.
Happy Learning !!